Easy to Make Halloween Wreath
This homemade wreath is easy to make with a recycled material. The project is fun for the family to do together, and it's sure to be everyone's favorite Halloween decoration.

This post contains affiliate links. Privacy and Disclosure
When store aisles are bursting with Halloween decorations, the choices can be daunting - or should I say haunting!
You can save money and put recyclables to good use by making your own decorations. This Halloween wreath is a great place to start. It's easy to make with recyclables and basic craft supplies.
This craft is sure to be a winner with kids and grownups. It's a great activity for engaging fine motor and sensory skills, and there are lots of options for finishing touches.
And the process for making it isn't scary at all!
Halloween wreath craft
We used screening left over from a screen door repair kit. You can substitute any fabric with a bit of stiffness to it and some transparency, such as a lace or mesh fabric.

Materials list
- cardboard circle
- black paint
- paint brush
- door screening or other mesh fabric
- stapler
The donut shape measures 11 inches (28 cm) diameter with a 6 inch (15 cm) diameter circle cut out inside.
This project was done with a stapler but you could use a glue gun if preferred.
Instructions for wreath decoration
1. Paint the cardboard circle with black craft paint and allow to dry.
2. Cut screening in a strip 2 inches (5 cm) wide.
- The length you need will depend on the size of the cardboard circle you start with. I had a very long piece to work with since we trimmed around the door, but one long piece isn't essential - you can join shorter pieces together as you make the wreath.

3. Make folds in the strip of screening.
Lift up a portion of fabric at the end of the strip - approximately 2 inches (5 cm). Make a fold as shown on the left.
Roll it over onto the strip then roll a second piece onto the first piece, as shown on the right.
- The second fold should overlap the first, leaving at least 1 inch (2.5 cm) of the first fold exposed.
Experiment with a few folds to observe the size and placement of folds before securing in place with staples.

4. Cover the painted wreath with the strip of screening.
- When you're ready, staple the first fold in place on the cardboard frame. Roll the second fold onto the first and staple in place. Continue with this procedure until the frame is covered.

This is another image of the staple and roll procedure.
5. Touch up any visible staples with black paint.

6. Decorate the wreath.
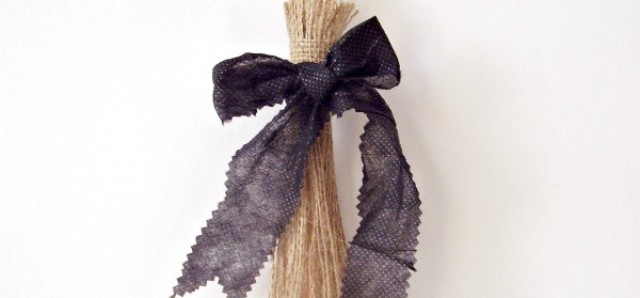
Finish the wreath with Halloween cutouts or a bow. Here are a few ideas.
- Make a bow with some of the screening.
- Cut a pumpkin shape from glitter foam. Glue eyes, nose and mouth to make a jack-o-lantern.
- Add ghosts or jack-o-lanterns made from scraps of felt.

This is a fun project for home or the classroom. Kids can help paint the wreath and add the decorations.
(Younger kids may need help applying the mesh fabric to the wreath frame.)
Reuse some items that might otherwise go to the landfill and end up with a fabulous Halloween decoration! You can proudly display the wreath inside or outside your home or classroom.
Happy Halloween!

Halloween crafts and activities on our Pinterest board.